Display Room Temperature on LCD with Arduino Uno and Rust
Build a temperature sensor with Embedded Rust on the Arduino Uno. Learn how to read an NTC thermistor with the ATmega328P ADC, calculate temperature using the Beta equation, and display the result on a 16x2 I2C LCD. This is the next experiment I did with the Arduino Uno and Embedded Rust. In the last post, I showed you how to use the Arduino Uno with Rust and how to check the final firmware size. The firmware size for the LED blinking program was just 262 bytes. This time, we will create a project where we display the room temperature on an HD44780 LCD using an NTC thermistor. I will not go into detail about how a thermistor works or what a voltage divider is in this post. If you are not familiar with these concepts, you can check out the thermistor chapters in either Pico Book or the ESP32 book. The Books are available for free. A thermistor is a resistor whose resistance changes with temperature. We are using an NTC thermistor, whose resistance decreases as the temperature increases. By measuring this change in resistance, we can calculate the temperature. For this project, we need the following components: We will connect the NTC thermistor and a The 16x2 HD44780 LCD is connected through I2C. The The complete hardware setup is shown below: The Arduino Uno provides Thermistor Circuit The junction between the resistor and thermistor is connected to the Arduino Uno’s A1 pin, allowing us to measure the voltage from the voltage divider. LCD Circuit What we read from the ADC is a digital value representing the voltage at the junction of the resistor and thermistor. We need to convert this value into temperature. First, we calculate the thermistor’s resistance from the ADC reading. We can then use that resistance to calculate the temperature. For our voltage divider, we can calculate the thermistor resistance using: $$ R_T = R_1 \frac{ADC}{ADC_{max} - ADC} $$ where: Once we have the thermistor resistance, we can calculate the temperature using the Beta equation: $$ T = \frac{1}{\frac{1}{T_0} + \frac{1}{B}\ln\left(\frac{R_T}{R_0}\right)} $$ The formula uses the thermistor’s current resistance ($R_T$), its reference resistance ($R_0$) at a reference temperature ($T_0$), and its Beta coefficient ($B$). Manufacturers usually provide these values. For our thermistor, $R_0 = 10 kΩ$ at $T_0 = 25°C$, and $B = 3950$. We calculate $R_T$ from the ADC reading. We will use the same Run the following command: The template will ask a few questions. Select Arduino Uno as the board and enter a name for your project. I will use Add the following crates to There are several Rust crates for communicating with an HD44780 LCD. I will use We will need the natural logarithm ( We will also use We can reduce the firmware size by avoiding the use of Let’s convert the formulas into Rust functions and define the corresponding constants. These functions should be obvious, so we will not go into detail about them. Let’s set up the ADC to read the thermistor connected to Next, let’s set up the I2C interface and initialize the LCD. In the main loop, we will read the ADC value and calculate the temperature from it. Since We can also format the temperature without using Let’s check the firmware size using the Now, let’s remove heapless and use the alternative approach we discussed earlier: By avoiding heapless, the firmware size decreases from 24,245 bytes to 20,815 bytes, saving 3,430 bytes. This was a quick win in terms of firmware size. I did not want to spend too much time on further optimization and overcomplicate this article, so i will stop here. Another Arduino Uno experiment is done. This time, we went a little beyond blinking an LED and built a simple room temperature monitor with a thermistor and I2C LCD. You can find the complete source code for this experiment on GitHub. You can navigate to the 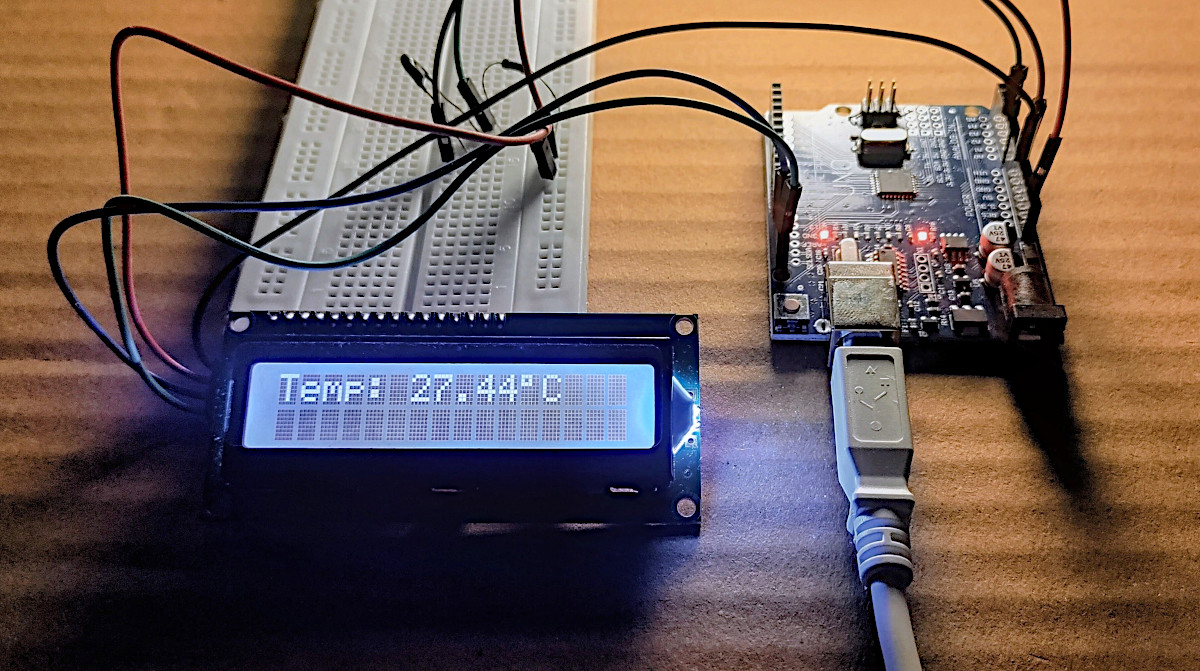
Components Required
Hardware Setup
10 kΩ resistor as a voltage divider. The output of the voltage divider is connected to the Arduino Uno’s A1 analog pin.SDA and SCL lines are connected to A4 and A5, respectively.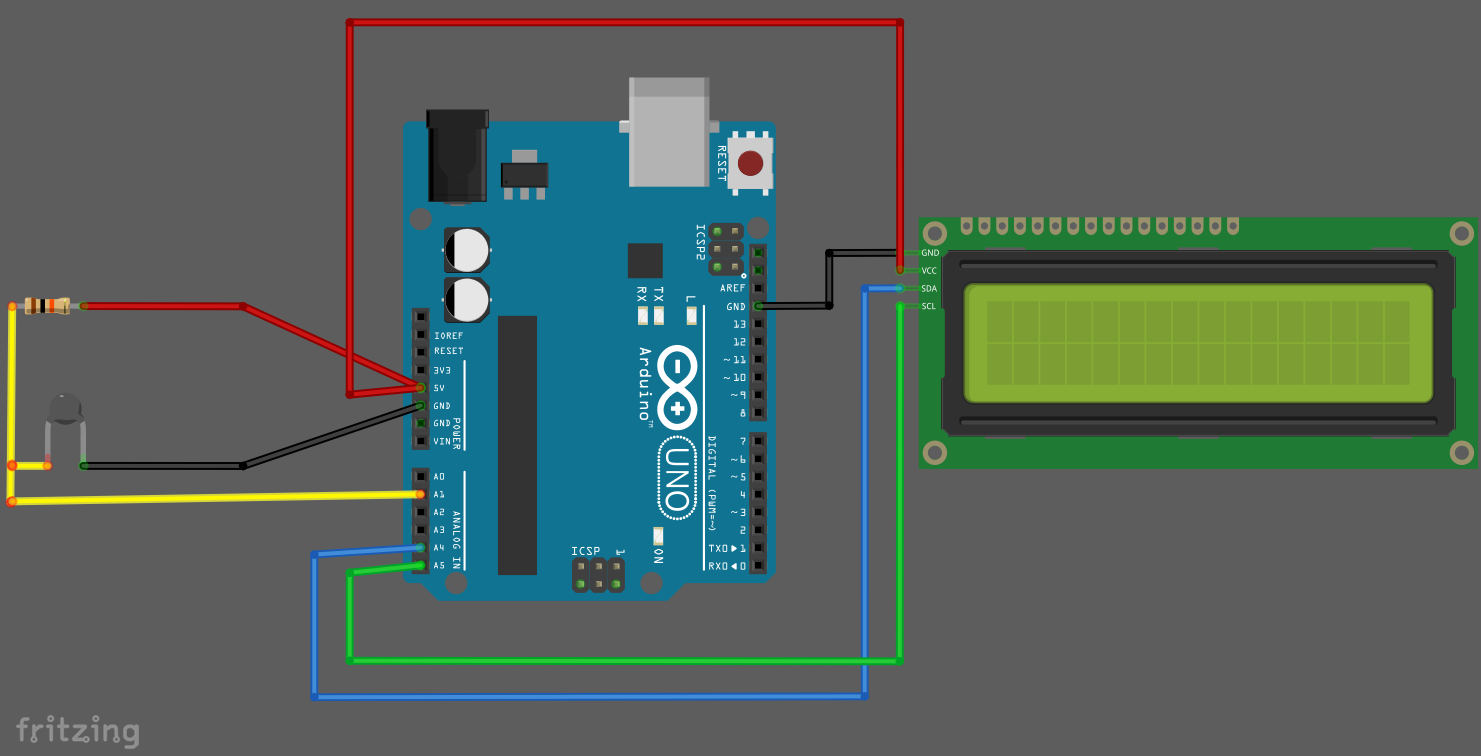
5 V power to both the thermistor circuit and the LCD. The Rust program will read the voltage divider through the ADC, calculate the temperature, and display it on the LCD.From Wire To Arduino Uno 5V 10 kΩ Resistor NTC Thermistor Arduino Uno GND 10 kΩ Resistor NTC Thermistor Junction between resistor and thermistor Arduino Uno A1 From Wire To Arduino Uno 5V LCD VCC Arduino Uno GND LCD GND Arduino Uno A4 (SDA) LCD SDA Arduino Uno A5 (SCL) LCD SCL From ADC Reading to Temperature
10 kΩ).1023 for the Arduino Uno). Project Setup
avr-hal project template that we used in the previous Arduino Uno project.cargo generate --git https://github.com/Rahix/avr-hal-template.gitroom-temperature as the project name. Crates
Cargo.toml:hd44780-driver = "0.4.0"
libm = "0.2.16"hd44780-driver. If you want custom character support, you can use a crate such as liquid_crystal.log) as part of the temperature calculation formula, so we use libm for this calculation in our no_std project.heapless to format the temperature value as text before sending it to the LCD:heapless = "0.9.3"heapless with a different approach. However, we will first use heapless to keep the code simple and then optimize it later. Converting ADC Reading to Temperature
const fn kelvin_to_celsius(kelvin: f64) -> f64 {
    kelvin - 273.15
}

const fn celsius_to_kelvin(celsius: f64) -> f64 {
    celsius + 273.15
}

const B_VALUE: f64 = 3950.0;

const REF_TEMP: f64 = 25.0; // Reference temperature 25°C
const REF_RES: f64 = 10_000.0; // Thermistor resistance at the Reference Temperature(25°C)
const REF_TEMP_K: f64 = celsius_to_kelvin(REF_TEMP);

const R1_RES: f64 = REF_RES; // 10_000.0 ohms

const ADC_MAX: f64 = 1023.0; // 1023 for 10-bit ADC

fn adc_to_resistance(adc_value: f64) -> f64 {
    let x: f64 = adc_value / (ADC_MAX - adc_value);
    R1_RES * x
}

// B Equation to convert resistance to temperature
fn calculate_temperature(current_res: f64, b_val: f64) -> f64 {
    let ln_value = libm::log(current_res / REF_RES); // Use libm for `no_std`
    let inv_t = (1.0 / REF_TEMP_K) + ((1.0 / b_val) * ln_value);
    1.0 / inv_t
}
Setting Up the ADC
A1.let mut adc = arduino_hal::Adc::new(dp.ADC, Default::default());
let a1 = pins.a1.into_analog_input(&mut adc); Setting Up the LCD
let i2c = arduino_hal::I2c::new(
dp.TWI,
pins.a4.into_pull_up_input(),
pins.a5.into_pull_up_input(),
50000,
);
let mut text: String<32> = String::new();
let mut delay = Delay::new();
let i2c_address = 0x27;
let Ok(mut lcd) = HD44780::new_i2c(
i2c,
i2c_address,
&mut delay,
) else {
panic!("failed to initialize display");
}; Reading and Displaying the Temperature
avr-hal does not support formatting floating-point values, we split the temperature into whole and fractional parts as i32 values. With the help of heapless, we format these values into a string and finally send the text to the LCD.let mut text: String<32> = String::new();
let mut delay = Delay::new();
loop {
let adc_value = a1.analog_read(&mut adc);
let current_res = adc_to_resistance(adc_value as f64);
let temperature_kelvin = calculate_temperature(current_res, B_VALUE);
let temperature_celsius = kelvin_to_celsius(temperature_kelvin);
// Clear the Heapless string
text.clear();
// Unshift display and set cursor to 0
lcd.reset(&mut delay).unwrap();
// Clear existing characters
lcd.clear(&mut delay).unwrap();
let whole = temperature_celsius as i32;
let frac = ((temperature_celsius.abs() * 100.0) as i32) % 100;
write!(&mut text, "{}.", whole).unwrap();
if frac < 10 {
write!(&mut text, "0").unwrap();
}
write!(&mut text, "{}", frac).unwrap();
lcd.write_str("Temp: ", &mut delay).unwrap();
lcd.write_str(text.as_str(), &mut delay).unwrap();
lcd.write_byte(0xDF, &mut delay).unwrap(); // Degree symbol °
lcd.write_char('C', &mut delay).unwrap();
arduino_hal::delay_ms(5000);
} Alternative: Avoiding
heaplessheapless, which helps reduce the firmware size. Instead of converting the temperature into a string, we can write each digit directly to the LCD.let temp_abs = temperature_celsius.abs();
let whole = temp_abs as u8;
let frac = ((temp_abs * 100.0) as i32) % 100;
// Logic to send temperature value without heapless
lcd.write_str("Temp: ", &mut delay).unwrap();
if temperature_celsius.is_sign_negative() {
lcd.write_str("-", &mut delay).unwrap();
}
lcd.write_byte((whole / 10) + b'0', &mut delay).unwrap();
lcd.write_byte((whole % 10) + b'0', &mut delay).unwrap();
lcd.write_char('.', &mut delay).unwrap();
lcd.write_byte((frac / 10) as u8 + b'0', &mut delay).unwrap();
lcd.write_byte((frac % 10) as u8 + b'0', &mut delay).unwrap();
lcd.write_byte(0xDF, &mut delay).unwrap(); // Degree symbol °
lcd.write_char('C', &mut delay).unwrap(); Firmware Size
heapless version:text data bss dec hex filename
23984 260 1 24245 5eb5 room-temperature.elftext data bss dec hex filename
20784 30 1 20815 514f room-temperature.elf The Full code
#![no_std]
#![no_main]
use arduino_hal::prelude::*;
use arduino_hal::Delay;
use core::fmt::Write;
use heapless::String;
use panic_halt as _;
// HD44780 Driver
use hd44780_driver::HD44780;
const fn kelvin_to_celsius(kelvin: f64) -> f64 {
kelvin - 273.15
}
const fn celsius_to_kelvin(celsius: f64) -> f64 {
celsius + 273.15
}
const B_VALUE: f64 = 3950.0;
const REF_TEMP: f64 = 25.0; // Reference temperature 25°C
const REF_RES: f64 = 10_000.0; // Thermistor resistance at the Reference Temperature(25°C)
const REF_TEMP_K: f64 = celsius_to_kelvin(REF_TEMP);
const R1_RES: f64 = REF_RES; // 10_000.0 ohms
const ADC_MAX: f64 = 1023.0; // 1023 for 10-bit ADC
fn adc_to_resistance(adc_value: f64) -> f64 {
let x: f64 = adc_value / (ADC_MAX - adc_value);
R1_RES * x
}
// B Equation to convert resistance to temperature
fn calculate_temperature(current_res: f64, b_val: f64) -> f64 {
let ln_value = libm::log(current_res / REF_RES); // Use libm for `no_std`
let inv_t = (1.0 / REF_TEMP_K) + ((1.0 / b_val) * ln_value);
1.0 / inv_t
}
#[arduino_hal::entry]
fn main() -> ! {
let dp = arduino_hal::Peripherals::take().unwrap();
let pins = arduino_hal::pins!(dp);
let mut serial = arduino_hal::default_serial!(dp, pins, 57600);
let mut adc = arduino_hal::Adc::new(dp.ADC, Default::default());
let a1 = pins.a1.into_analog_input(&mut adc);
let i2c = arduino_hal::I2c::new(
dp.TWI,
pins.a4.into_pull_up_input(),
pins.a5.into_pull_up_input(),
50000,
);
let mut text: String<32> = String::new();
let mut delay = Delay::new();
let i2c_address = 0x27;
let Ok(mut lcd) = HD44780::new_i2c(i2c, i2c_address, &mut delay) else {
panic!("failed to initialize display");
};
lcd.set_cursor_visibility(hd44780_driver::Cursor::Invisible, &mut delay)
.unwrap();
lcd.set_cursor_blink(hd44780_driver::CursorBlink::Off, &mut delay)
.unwrap();
loop {
let adc_value = a1.analog_read(&mut adc);
ufmt::uwriteln!(&mut serial, "ADC: {}", adc_value).unwrap_infallible();
let current_res = adc_to_resistance(adc_value as f64);
let temperature_kelvin = calculate_temperature(current_res, B_VALUE);
let temperature_celsius = kelvin_to_celsius(temperature_kelvin);
// Clear the Heapless string
text.clear();
// Unshift display and set cursor to 0
lcd.reset(&mut delay).unwrap();
// Clear existing characters
lcd.clear(&mut delay).unwrap();
let whole = temperature_celsius as i32;
let frac = ((temperature_celsius.abs() * 100.0) as i32) % 100;
// Alternative: Avoiding Heapless
// let temp_abs = temperature_celsius.abs();
// let whole = temp_abs as u8;
// let frac = ((temp_abs * 100.0) as i32) % 100;
ufmt::uwrite!(&mut serial, "Temperature: {}.", whole).unwrap_infallible();
write!(&mut text, "{}.", whole).unwrap();
if frac < 10 {
ufmt::uwrite!(&mut serial, "0").unwrap_infallible();
write!(&mut text, "0").unwrap();
}
write!(&mut text, "{}", frac).unwrap();
ufmt::uwriteln!(&mut serial, "{} °C", frac).unwrap_infallible();
lcd.write_str("Temp: ", &mut delay).unwrap();
lcd.write_str(text.as_str(), &mut delay).unwrap();
lcd.write_byte(0xDF, &mut delay).unwrap(); // Degree symbol °
lcd.write_char('C', &mut delay).unwrap();
// Alternative: Avoiding Heapless
// Logic to send temperature value without heapless
// lcd.write_str("Temp: ", &mut delay).unwrap();
// if temperature_celsius.is_sign_negative() {
// lcd.write_str("-", &mut delay).unwrap();
// }
//
// lcd.write_byte((whole / 10) + b'0', &mut delay).unwrap();
// lcd.write_byte((whole % 10) + b'0', &mut delay).unwrap();
// lcd.write_char('.', &mut delay).unwrap();
// lcd.write_byte((frac / 10) as u8 + b'0', &mut delay)
// .unwrap();
// lcd.write_byte((frac % 10) as u8 + b'0', &mut delay)
// .unwrap();
//
// lcd.write_byte(0xDF, &mut delay).unwrap(); // Degree symbol °
// lcd.write_char('C', &mut delay).unwrap();
arduino_hal::delay_ms(5000);
}
} Final Thoughts
room-temperature folder to find the code for this project.